# 原型链
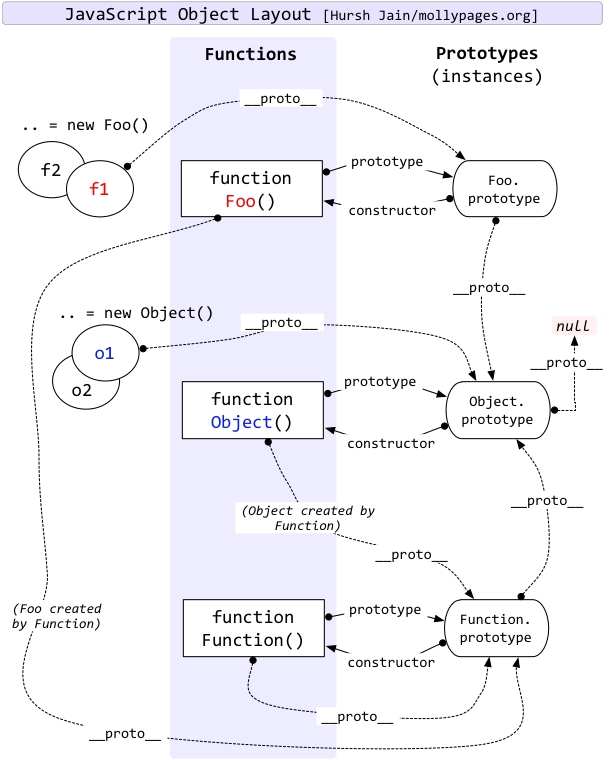
每个实例对象都有一个 __proto__ 的私有属性指向它的构造函数的原型对象。该原型对象也有一个 __proto__ 的私有属性指向它的构造函数的原型对象,就这样层层向上,直到构造函数 Object 的原型对象 null,这就是原型链。根据定义,null 没有原型,并作为这个原型链中的最后一个环节。
下面是网络上传播很广的一张关于原型链的图:

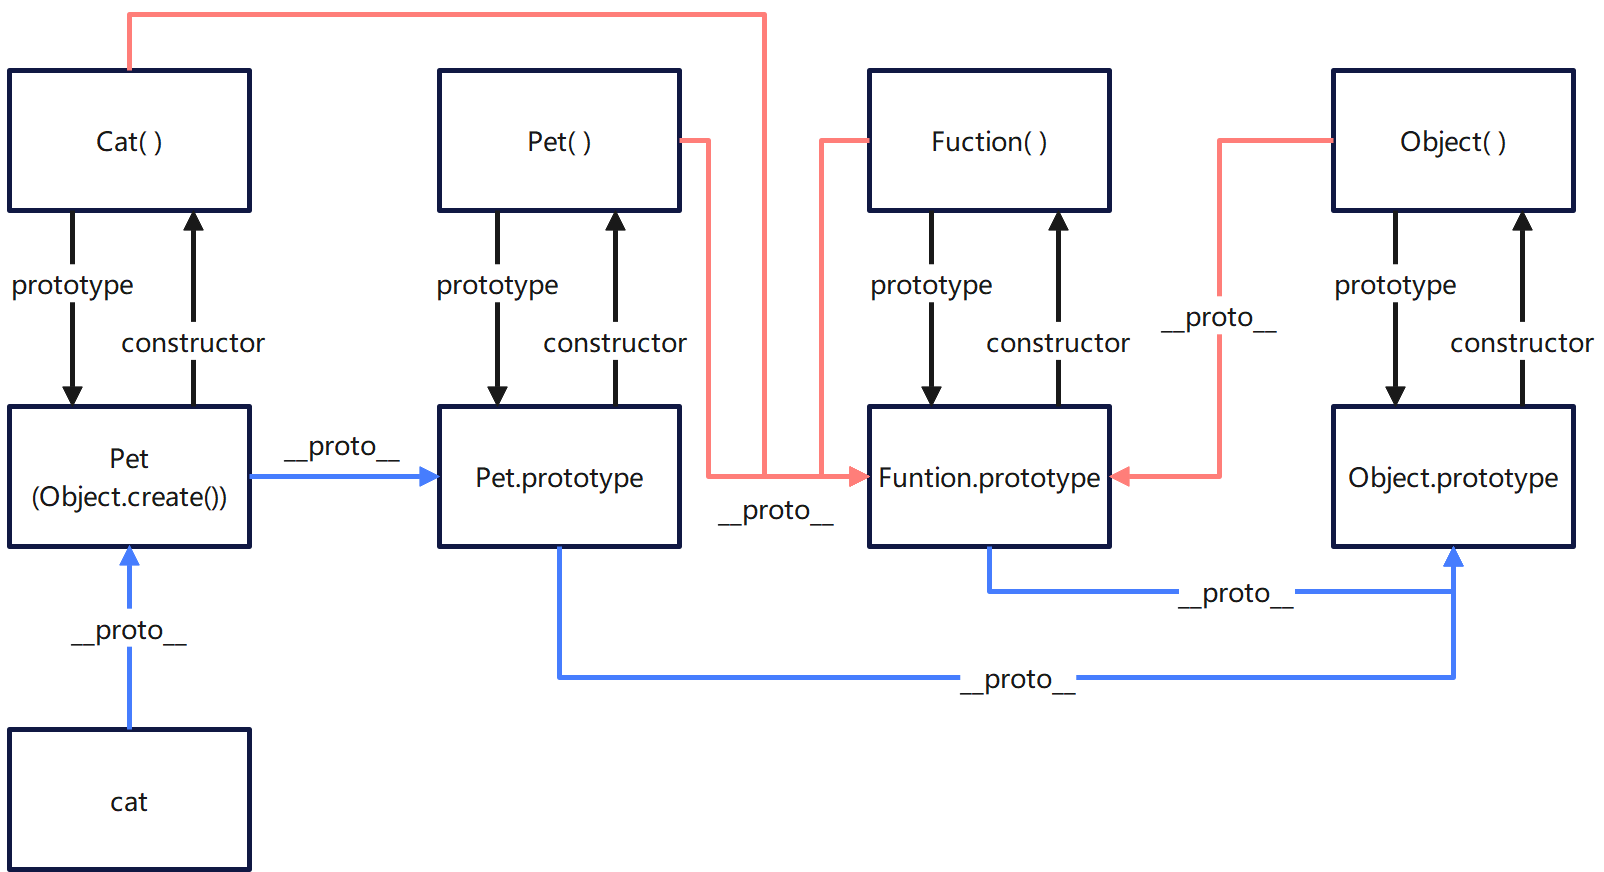
如果你觉得上面的图很乱,可以看下面我整理的这张(点击放大):

记忆口诀:
- 蓝色线:所有的对象(包括 .prototype 对象)最终都指向 Object.prototype,以继承对象共有的属性和方法 (valueOf、hasOwnProperty 等);
- 红色线:所有的函数(包括构造函数),都要先指向 Function.prototype,以继承函数共有的方法 (apply、call、bind),然后再指向 Object.prototype。
# 基于原型链的继承
原型对象上的所有属性和方法,都能被对应的构造函数创建的实例对象共享。在读取对象的某个属性或方法时,JavaScript 引擎将首先检查对象本身是否存在该属性。 如果不存在,就会沿着__proto__到它的构造函数的原型对象上去找。如果找不到,就会沿着__proto__查找;如果直到最顶层的 Object.prototype 还是找不到,则返回 undefined。
需要注意的是,在原型链寻找某个属性,对性能是有影响的。所寻找的属性在越上层的原型对象,对性能的影响越大。如果寻找某个不存在的属性,将会遍历整个原型链。
# 对象的创建
# 工厂模式
function createPerson(name, age, job) {
  let o = new Object();
  o.name = name;
  o.age = age;
  o.job = job;
  o.sayName = function() {
    console.log(this.name);
  };
  return o;
}
let person1 = createPerson("小明", 29, "Software Engineer");
let person2 = createPerson("小红", 27, "Doctor");

console.log(person1)
2
3
4
5
6
7
8
9
10
11
12
13
14
# person1 在 chrome 控制台的原型链结构
age: 29
job: "Software Engineer"
name: "小明"
sayName: ƒ ()
# __proto__ 直接指向 Object 的原型,而不是 createPerson
[[Prototype]]: Object
  constructor: ƒ Object()
  hasOwnProperty: ƒ hasOwnProperty()
  ...
2
3
4
5
6
7
8
9
10
优点:可以解决创建多个类似对象的问题。
缺点:没有解决对象标识问题(无法使用 instanceof)。
# 构造函数模式
function Person(name, age, job){
  this.name = name;
  this.age = age;
  this.job = job;
  this.sayName = function() {
    console.log(this.name);
  };
}

let person1 = new Person("小明", 29, "Software Engineer");
let person2 = new Person("小红", 27, "Doctor");

person1.sayName(); // 小明
person2.sayName(); // 小红
2
3
4
5
6
7
8
9
10
11
12
13
14
# person1 在 chrome 控制台的原型链结构
age: 29
job: "Software Engineer"
name: "小明"
sayName: ƒ () # 这个方法在每个实例上都有
[[Prototype]]: Object # __proto__ 指向了 Person 的原型
  constructor: ƒ Person(name, age, job)
  [[Prototype]]: Object
    constructor: ƒ Object()
    hasOwnProperty: ƒ hasOwnProperty()
2
3
4
5
6
7
8
9
10
Person() 内部的代码跟工厂模式 createPerson() 基本是一样的,只是有如下区别。
- 没有显式地创建对象。
- 属性和方法直接赋值给了 this。
- 没有 return。
使用 new 操作符创建实例会执行以下操作:
- 在内存中创建一个新对象。
- 这个新对象内部的
[[Prototype]]特性被赋值为构造函数的 prototype 属性。 - 构造函数内部的 this 被赋值为这个新对象(即 this 指向新对象)。
- 执行构造函数内部的代码(给新对象添加属性)。
- 如果构造函数返回非空对象,则返回该对象;否则,返回刚创建的新对象。
优点:可以确定实例是什么类型(可以使用 instanceof)。
缺点:定义的方法会在每个实例上都创建一遍。
# 原型模式
function Person() {}
  Person.prototype.name = "小明";
  Person.prototype.age = 29;
  Person.prototype.job = "Software Engineer";
  Person.prototype.sayName = function() {
  console.log(this.name);
};

let person1 = new Person();
person1.sayName(); // "小明"
let person2 = new Person();
person2.sayName(); // "小明"

console.log(person1.sayName == person2.sayName); // true
2
3
4
5
6
7
8
9
10
11
12
13
14
优点:原型上定义的属性和方法可以被对象实例共享。
缺点:对象实例添加一个属性,这个属性会遮蔽( shadow)原型对象上的同名属性。
# 构造函数 + 原型
使用最为广泛!
// 属性放在构造函数中
function Person(name, age, job){
  this.name = name;
  this.age = age;
  this.job = job;
  this.friends = ["Shelby", "Court"];
}
// 方法挂载原型上
Person.prototype = {
  constructor : Person,
  sayName : function(){
    alert(this.name);
  }
}

var person1 = new Person("Nicholas", 29, "Software Engineer");
var person2 = new Person("Greg", 27, "Doctor");

person1.friends.push("Van");
alert(person1.friends); // "Shelby,Count,Van"
alert(person2.friends); // "Shelby,Count"
alert(person1.friends === person2.friends); // false
alert(person1.sayName === person2.sayName); // true
2
3
4
5
6
7
8
9
10
11
12
13
14
15
16
17
18
19
20
21
22
23
优点:每个实例有自己的属性,并共享着原型上的方法。
缺点:暂未发现。
# 继承方式
# 基本模式
function Pet () {
  this.cute = true;
}
Pet.prototype.isCute = function () {
  return this.cute;
};
function Cat () {
  this.name = false;
}

// Cat 的原型对象被修改为 Pet 的实例,Cat 继承了 Pet
Cat.prototype = new Pet();
Cat.prototype.getName = function () {
  return this.name;
};

var instance = new Cat();
alert(instance.isCute()); // true
2
3
4
5
6
7
8
9
10
11
12
13
14
15
16
17
18
缺点:Pet 实例上的属性,被添加到了 Cat.prototype 上,我们希望的是 prototype 上只有方法。
WARNING
在通过原型链实现继承时,不能使用对象字面量创建原型方法。因为这样做会重写原型链。
// = 右侧的对象是 Object 构造函数的实例,而不再是 Pet 的实例
Cat.prototype = {
  getName : function () {
    return this.name;
  }
};
2
3
4
5
6
# 经典继承
也叫借用构造函数模式。
function Pet () {
  this.colors = ["red", "blue", "green"];
}
function Cat () {
  // 借用了 Pet 构造函数
  Pet.call(this)
}

var cat1 = new Cat();
cat1.colors.push("black");
alert(cat1.colors); // "red,blue,green,black"

var cat2 = new Cat();
alert(cat2.colors); // "red,blue,green"
2
3
4
5
6
7
8
9
10
11
12
13
14
优点:可以在借用父构造函数时传参。 缺点:函数无法复用。
# 组合式继承
也叫伪经典继承,就是 基本模式+经典继承。
组合继承避免了原型链和借用构造函数的缺陷,融合了它们的优点,成为 JavaScript 中最常用的继承模式。而且,instanceof 和 isPrototypeOf() 也能够用于识别基于组合继承创建的对象。
function Pet (cute) {
  this.cute = cute;
  this.colors = ["red", "blue", "green"];
}
Pet.prototype.isCute = function () {
  alert(this.cute);
};
function Cat (cute, name) {
  // 继承属性
  Pet.call(this, cute)
  this.name = name;
}

// 继承方法
Cat.prototype = new Pet()
Cat.prototype.constructor = Cat;
Cat.prototype.sayName = function () {
  alert(this.name)
}

var cat1 = new Cat(true, "小明");
cat1.colors.push("black");
alert(cat1.colors); // "red,blue,green,black"
cat1.isCute();      // true
cat1.sayName();     // "小明";

var cat2 = new Cat(false, "小红");
alert(cat2.colors); // "red,blue,green"
cat2.isCute();      // false
cat2.sayName();     // "小红";
2
3
4
5
6
7
8
9
10
11
12
13
14
15
16
17
18
19
20
21
22
23
24
25
26
27
28
29
30
缺点:无论什么情况下,都会调用两次 Pet 构造函数:一次是在创建 Cat 原型的时候,另一次是在 Cat 构造函数内部。
# 原型式继承
基于现有对象快速的创建新对象,可以使用现有对象的属性和方法。
// 从本质上讲, object() 对传入其中的对象执行了一次浅复制
function object(o){
  function F(){}    // 创建构造函数
  F.prototype = o;  // 修改原型对象
  return new F();   // 返回实例
}
2
3
4
5
6
EC5 通过新增 Object.create() 方法规范化了原型式继承。这个方法接收两个参数:
- 一个用作新对象原型的对象
- 一个为新对象定义额外属性的对象(可选的)。
- 是一个属性描述对象
- 第二个参数不传时和原型继承的 object() 方法一样
const cat = {
  name: "小明",
  sayName: function () {
    alert(this.name)
  }
}

const cat1 = Object.create(cat, {
  name: {
    value: "小红"
  }
})

console.log(cat1)
2
3
4
5
6
7
8
9
10
11
12
13
14
# cat1 在 chrome 控制台显示的原型链结构

name: "小红"
[[Prototype]]: Object
  name: "小明"
  sayName: ƒ ()
  [[Prototype]]: Object
    constructor: ƒ Object()
    hasOwnProperty: ƒ hasOwnProperty()
    isPrototypeOf: ƒ isPrototypeOf()
    toString: ƒ toString()
    valueOf: ƒ valueOf()
    ...
2
3
4
5
6
7
8
9
10
11
12
13
优点:快速,方便。 缺点:由于是浅拷贝,所以引用类型的属性共享一个值,创建多个对象时,修改一个属性影响所有对象。
# 寄生式继承
大白话:把原型式继承包了一层,在新对象上加一些属性和方法,返回新对象。
虽然其优缺点和原型式继承一样,但相比于原型式继承,还是在父类基础上添加了更多的方法。
function createAnother(obj){
  var clone = Object.create(obj); // 原型式继承
  clone.sayHi = function(){ // 增强这个对象
    alert("hi");
  };
  return clone; // 返回这个对象
}

var person = {
  name: "小明",
  friends: ["小红", "小花"]
};
var anotherPerson = createAnother(person);

console.log(anotherPerson)
2
3
4
5
6
7
8
9
10
11
12
13
14
15
# 寄生组合式继承
组合继承 + 寄生式继承,通过借用构造函数来继承属性,通过原型链的混成形式来继承方法。
基本思路是:修改 Cat 的原型时不再生成 Pet 的实例,而是使用 Object.create() 创建一个新对象,这个新对象的 __proto__属性指向 Pet.prototype。
// 基本模式
function inheritPrototype(Cat, Pet){
  const proto = Object.create(Pet.prototype); // 创建对象
  proto.constructor = Cat; // 修改指针
  Cat.prototype = proto; // 修改原型
}
2
3
4
5
6
function Pet(name){
  this.name = name;
  this.colors = ["red", "blue", "green"];
}
Pet.prototype.sayName = function(){
  alert(this.name);
};
function Cat(name, age){
  // 这里依然调用 Pet 来继承属性
  Pet.call(this, name);
  this.age = age;
}

// 继承方法时不再使用 Pet 的实例
inheritPrototype(Cat, Pet);
Cat.prototype.sayAge = function(){};

const cat = new Cat("小明", 3)
console.dir(cat)
2
3
4
5
6
7
8
9
10
11
12
13
14
15
16
17
18
19
# cat 实例在 chrome 控制台显示的原型链结构

Cat
age: 3
colors: (3) ['red', 'blue', 'green']
name: "小明"
# 此对象由 Object.create 创建,__proto__ 指向 Pet.prototype 对象
[[Prototype]]: Pet
  constructor: ƒ Cat(name, age)
  sayAge: ƒ ()
  # 这个是 Pet.prototype 对象
  [[Prototype]]: Object
    constructor: ƒ Pet(name)
    sayName: ƒ ()
    [[Prototype]]: Object
      constructor: ƒ Object()
      hasOwnProperty: ƒ hasOwnProperty()
      toString: ƒ toString()
      valueOf: ƒ valueOf()
      ...
2
3
4
5
6
7
8
9
10
11
12
13
14
15
16
17
18
19
20

# ES6 extends
ES6 类支持单继承。使用 extends 关键字,就可以继承任何拥有[[Construct]]和原型的对象。很大程度上,这意味着不仅可以继承一个类,也可以继承普通的构造函数(保持向后兼容)。
因为浏览器的兼容性问题,如果遇到不支持 ES6 的浏览器,那么就得利用 babel 这个编译工具,将 ES6 的代码编译成 ES5,让一些不支持新语法的浏览器也能运行。
class Pet {}
class Cat extends Pet {}

const cat = new Cat()
console.dir(cat)
2
3
4
5

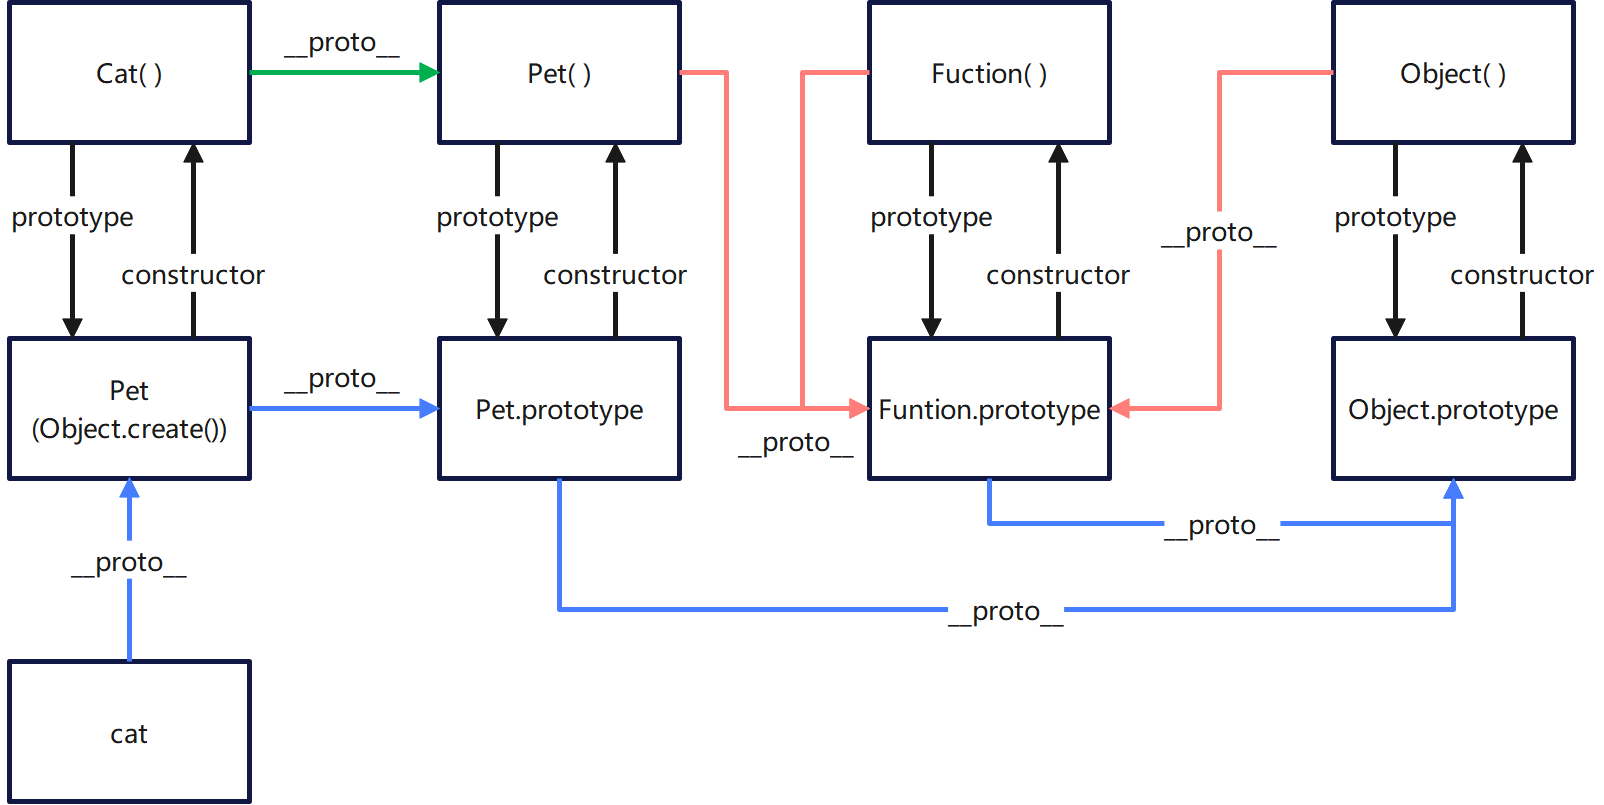
请注意图中的绿色线,是 extends 继承与寄生组合式继承的区别!
区别:在 ES6 中,父类的静态方法,可以被子类继承。这是因为 Class 作为构造函数的语法糖,同时有 prototype 属性和 __proto__ 属性,因此同时存在两条继承链。
- 子类的
__proto__属性,表示构造函数的继承,总是指向父类。 - 子类
prototype属性的__proto__属性,表示方法的继承,总是指向父类的prototype属性。
class Parent {}
class Child extends Parent {}

console.log(Child.__proto__ === Parent) // true
console.log(Child.prototype.__proto__ === Parent.prototype) // true
2
3
4
5
